Heads up: this is a repost from early 2010 – had to fix some of my “early blogger” formatting uglies ![]()

So I’ve been looking for new, pretty hooks to put next to the back door. I was going to show you my shoe organizer today too, but I’m afraid the post will be SUPER long. So you’ll get plenty of pictures but I’ll post all the organizer details tomorrow.
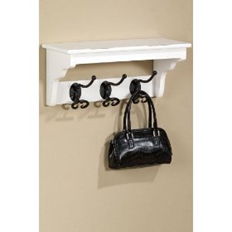
For the hooks, I knew I wanted something white…
…With a shelf, to provide a little extra storage if necessary (and a cute place for decor if not).
…And it had to be about 18” or less in length to fit in its designated spot.
After MUCH googling around, I found this, which is perfect:
It’s also $39. That seems a little much, so it’s going to be Plan B.
Plan A is making my own. See that wooden shelf hiding in the back of the pile there? (That’s my pile of recent Goodwill treasures- some of which have already been transformed/placed.) It’s going to get a makeover! Right now is a good time to say that there is a TON of wooden stuff at Goodwill (or maybe just my local Goodwill). Shelves, trays, all kinds of weird shaped things that someone built….and I really think that the wooden-stuff aisle there has some SERIOUS potential for some really fun projects, especially if you are into Shabby Chic!!! You should absolutely go check it out. And it’s cheap (even for Goodwill prices), because there’s so much to choose from.
I don’t remember the exact price…but I’m going to say it was probably around $3 and I got everything for half off on this particular trip. $1.50. Big Spender, I am!
I primed it because I had the primer out. Then I realized I wanted to cut a little off each end. So I did that, using my handy-dandy little hand saw, and primed it again. I use grocery bags instead of newspaper under my painting projects so I can be sloppy. That way I don’t end up with newspaper bits stuck to my paint . Keep in mind that the ink on grocery bags will come off on your project so make sure you use the back of the bags or you only set your pieces down where ink on them won’t matter.

You know what’s great about a hand saw? I don’t have to take my project up the stairs and into the garage 🙂 I can be the Queen of lazy sometimes.
Then I grabbed a piece of extra bead board from the garage.
I decided to use the beadboard on the whole back instead of just a strip between the corbels (like the $39 one has just the skinny back piece.) I think it will add a little more stability, and it’ll show more of the beadboard detail.
I cut it to size, and screwed it on. I also put a screw down into the top of each corbel as they were a little wobbly.
Little bit of sanding and several coats of paint later:

(Quick little aside – I actually bought “tack cloths” to use for my sanding. Usually I just use a wet paper towel to clean off the sanding dust. Tack cloths work really well, but they are SO sticky – like fabric covered in sticky stuff, and they leave your hands sticky for a while afterwards. They come 3 to a pack for about $3, and they’re in the paint department at the hardware store. I was clueless, so I’m sharing ![]() )
)
Then I installed the “hooks”, which are actually drawer pulls. ($3 each at HD) I had to be careful with what I chose because they needed to be installed from the back of the piece so nothing would stick out into the wall. All the traditional “hooks” I saw required screws to go in from the front, which wouldn’t work this time.
And then I put it up on the wall with drywall anchors. The hooks aren’t really designed to hold a whole lot (since the shelf itself isn’t mounted to studs), but a light jacket or a purse or both will be just fine.
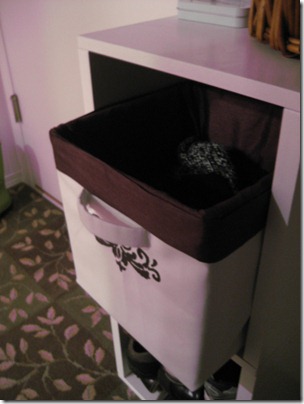
You can see how compact these little storage solutions needed to be! Below the shelf is the shoe/mitten organizer I keep mentioning. I’ll go into more detail on that in tomorrow’s post. The basket is our “junk” basket. It’s a catch all for keys, wallets, a fuzz roller, gum etc


So, let’s see…. I had the beadboard scraps. I had the primer and white paint. Had the tools.
Total cost = $1.50 for shelf + 3 hooks at $3 each = $10.50
Not bad! I guess I didn’t need a $39 Plan B after all. If you don’t have beadboard scraps on hand, a sheet of the beadboard paneling is inexpensive and HD or Lowe’s will cut it into smaller pieces for you (for free!). You’d still come out ahead, AND you’d have LOTS of extra beadboard for other projects. Maybe the best part 🙂
And I’ll post all about my shoe/mitten organizer tomorrow!
Thanks for stopping by!
Suburban gardening how-to's and inspiration


You did a great job!!
LikeLike
Nice job. Looks great! Love the hooks!
LikeLike
Great job! Making exactly what you need from exactly what you have! Love it!
LikeLike
That's great! Love the beadboard <3Thanks for linking up!Rachelle
LikeLike
Omgosh – thanks for your comment Rachelle – it reminded me to add the link back to you! I almost forgot 🙂
LikeLike
What an adorable shelf you have created!! I love the hooks. What a great idea 🙂
LikeLike